はじめに
QtとWebKitを併用したアプリケーションでは、
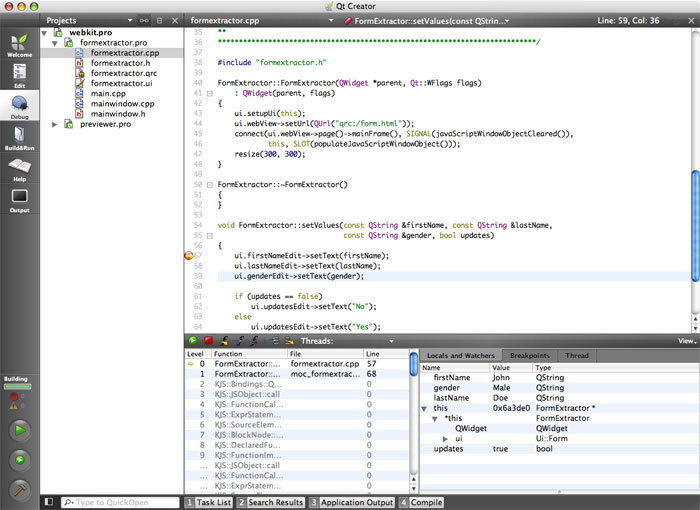
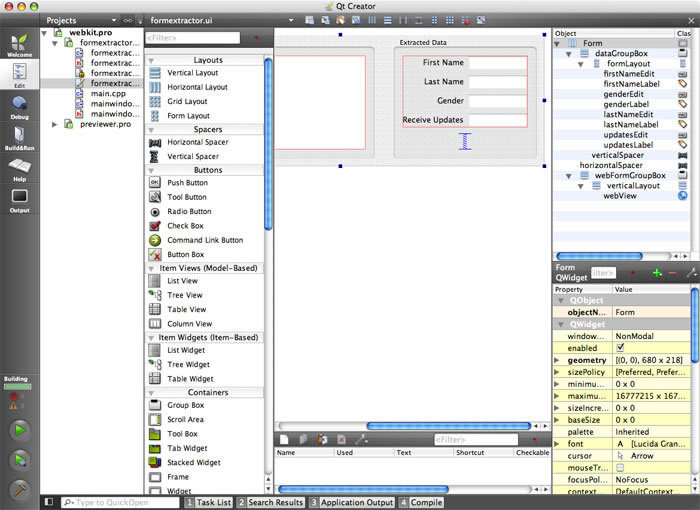
Qt Creator
QtをIDEで使うには、
Qt Creatorは、
- 編集機能
- C++用のエディタ
- ファイルとクラスのナビゲーション用ツール
- ヘルプシステムとの統合
- Qt Designerとの統合
- デバッグ機能
- GDBデバッガのグラフィカルフロントエンド
- QStringやQStringListなどのQtのクラスを解釈したオブジェクトの内容表示
- ビルドと実行
- qmakeビルドツールとの統合
- プロジェクト作成
Qt Creatorは開発中のQt 4.
正式リリース時期は2009年の第一四半期で、
Webフォームへのアクセス
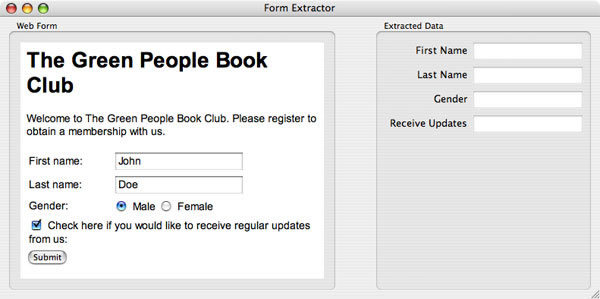
Webフォームに入力された値をQt/
図の左側はHTMLで記述された入力フォームです。右側はQtのウィジェットで、
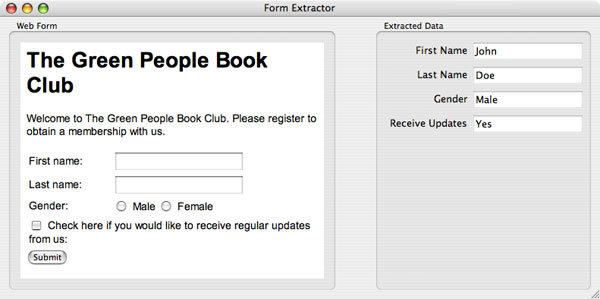
まず、
01: <html><script>
02: function extractFormValues()
27行目で、
03: {
04:     var firstName = document.getElementById("firstname").value;
05:     var lastName = document.getElementById("lastname").value;
06:     var maleGender = document.getElementById("genderMale");
07:     var femaleGender = document.getElementById("genderFemale");
08:
09:     var gender = "";
10:     if (maleGender.checked)
11:         gender = maleGender.value;
12:     else if (femaleGender.checked)
13:         gender = femaleGender.value;
14:
15:     var updates = document.getElementById("updates").checked;
入力項目には以降のように、
16:
17:     formExtractor.setValues(firstName, lastName, gender, updates);
formExtractorは、
19: </script><body>
20: <h1>
21: The Green People Book Club
22: </h1>
23:
24: <p>
25: Welcome to The Green People Book Club. Please register to obtain a membership with us.
26: </p>
27:     <form onsubmit="extractFormValues()">
28:     <table>
29:     <tbody><tr>
30:         <td>
31:         First name:
32:         </td>
33:         <td>
34:             <input type="text" id="firstname">
35:         </td>
36:     </tr>
37:     <tr>
38:         <td>
39:         Last name:
40:         </td>
41:         <td>
42:             <input type="text" id="lastname">
43:         </td>
44:     </tr>
45:     <tr>
46:         <td>
47:         Gender:
48:         </td>
49:         <td>
50:         <input type="radio" name="gender" id="genderMale" value="Male"> Male
51:         <input type="radio" name="gender" id="genderFemale" value="Female"> Female
52:         </td>
53:     </tr>
54:     <tr>
55:         <td colspan="2">
56:         <input type="checkbox" id="updates" value="receive">
57:         Check here if you would like to receive regular updates from us:
58:         </td>
59:     </tr>
60:     </tbody></table>
61:     <input type="submit" value="Submit">
62:     </form>
63:
64: </body></html>53: public slots:
54: void setValues(const QString &firstName, const QString &lastName,
55: const QString &gender, bool updates);setValues()は、
56:
57: void populateJavaScriptWindowObject();40: FormExtractor::FormExtractor(QWidget *parent, Qt::WFlags flags)
41: : QWidget(parent, flags)
42: {
43: ui.setupUi(this);
44: ui.webView->setUrl(QUrl("qrc:/form.html"));
45: connect(ui.webView->page()->mainFrame(), SIGNAL(javaScriptWindowObjectCleared()),
46: this, SLOT(populateJavaScriptWindowObject()));
47: resize(300, 300);
48: }シグナルQFrame::javaScriptWindowObjectCleared()が送信されるのは、
54: void FormExtractor::setValues(const QString &firstName, const QString &lastName,
55:                               const QString &gender, bool updates)
56: {
57:     ui.firstNameEdit->setText(firstName);
58:     ui.lastNameEdit->setText(lastName);
59:     ui.genderEdit->setText(gender);
60:
61:     if (updates == false)
62:         ui.updatesEdit->setText("No");
63:     else
64:         ui.updatesEdit->setText("Yes");
65: }
前述のように、
67: void FormExtractor::populateJavaScriptWindowObject()
68: {
69:     ui.webView->page()->mainFrame()->addToJavaScriptWindowObject("formExtractor", this);
70: }
このインスタンス自身をJavaScript環境のフレームのウィンドウオブジェクトに追加しています。このようにすることで、
Google Mapの例
図5のような、
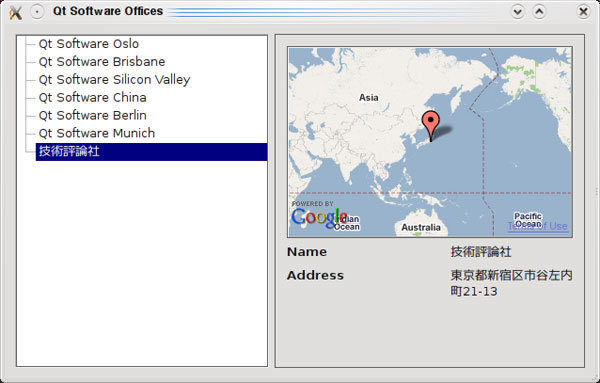
このアプリケーションについて説明しましょう。ソースコードはhttp://
ジオコーディング
準備として、
まず、
$ ./addr2coord 富士山
QPointF(35.3629, 138.731)
$ ./addr2coord 東京都千代田区平河町
QPointF(35.682, 139.74)
$
01: #include <QCoreApplication>
02: #include <QNetworkRequest>
03: #include <QNetworkAccessManager>
04: #include <QNetworkReply>
05: #include <QStringList>
06: #include <QDebug>
07: #include <QPointF>
08:
09: #define GOOGLE_MAPS_KEY "自分の Google Maps Key"
10:
11: class Addr2Coord : public QObject
12: {
13:     Q_OBJECT
14:
15: public:
16:     Addr2Coord() {
17:         manager = new QNetworkAccessManager( this );
18:         connect( manager, SIGNAL( finished( QNetworkReply* ) ),
19:                  this, SLOT( replyFinished( QNetworkReply* ) ) );
20:     }
QNetworkAccessManagerを使うと、
21:
22: signals:
23:     void finished();
ネットワークリクエストの結果を取得して処理が終わったときに送信するシグナルを定義します。
24:
25: public slots:
26:     void geoCode( const QString& address ) {
27:         QString requestStr = QString( "http://maps.google.com/maps/geo?q=%1&output=%2&key=%3" )
28:                                       .arg( address )
29:                                       .arg( "csv" )
30:                                       .arg( GOOGLE_MAPS_KEY );
31:
32:         manager->get( QNetworkRequest( requestStr ) );
33:     }
34:
URI http://
| q | 住所 |
| output | 生成される出力の形式。xml、 |
| key | 自分のGoogle Maps APIキー。Qt Labsの方のコードでは文字列"GOOGLE_ |
35:     void replyFinished( QNetworkReply* reply ) {
36:         QString replyStr( reply->readAll() );
37:         QStringList coordinateStrList = replyStr.split( "," );
38:
39:         if ( coordinateStrList.size() == 4 ) {
40:             QPointF coordinate( coordinateStrList[2].toFloat(), coordinateStrList[3].toFloat() );
41:             qDebug() << coordinate;
42:             emit finished();
43:         }
44:     }
45:
QNetworkReplyはQIODeviceを継承しているので、
HTTP 状態コード, 精度, 緯度, 経度46: private:
47: QNetworkAccessManager* manager;
48: };
49:
50: int main( int argc, char** argv )
51: {
52: QCoreApplication app( argc, argv );
53:
54: if ( argc != 2 ) {
55: qDebug() << "Usage: addr2coord address";
56: exit( 1 );
57: }
58:
59: QString address = QString::fromLocal8Bit( argv[1] );
60:
61: Addr2Coord addr2coord;
62: addr2coord.geoCode( address );
63:
64: QObject::connect( &addr2coord, SIGNAL( finished() ), &app, SLOT( quit() ) );
65:
66: return app.exec();
67: }
68:
69: #include "addr2coord.moc"日本語の住所も扱えるように、
地図の表示
図5の画面レイアウトはQt Designerで作成されていて、
- http://
chaos. troll. no/~hhartz/ visualaccess/ index. html
このURLの記述内容は、
Qt Software Oslo, Sandakerveien 116, 0402 OSLO, Norway
Qt Software Brisbane, Brisbane, Australia
Qt Software Silicon Valley, Redwood City, CA 94065, USA
Qt Software China, Beijing, China
Qt Software Berlin, Berlin, Germany
Qt Software Munich, Munich, Germany
技術評論社, 東京都新宿区市谷左内町21-13
この内容をQTreeViewに表示するために、
14:         void initModel()
15:         {
16:             foreach ( QString address, this->addresses() ) {
17:                 QModelIndex idx = this->index( this->rowCount(), 0 , QModelIndex() );
18:
19:                 QStringList addressLines = address.split( "," );
20:
21:                 QStandardItem* item = new QStandardItem;
22:                 this->insertRow( this->rowCount(), item );
23:
24:                 item->setData( addressLines.first(), Qt::DisplayRole );
25:                 addressLines.removeFirst();
26:
27:                 item->setData( addressLines.join( "," ).trimmed(), Qt::UserRole );
28:             }
29:         }
1番目のフィールドをQTreeViewに表示し、
31:         QStringList addresses() {
32:             QFile file( "addresses.txt" );
33:             if( file.open( QFile::ReadOnly) ) {
34:                 QString addressText = QString::fromUtf8( file.readAll() );
35:                 addressText.chop( 1 );
36:                 return addressText.split( QChar( '\n' ) );
37:             }
38:             return QStringList();
39:        }
ファイル全体を読み込んで、
11: MainWindow::MainWindow( QWidget* parent, Qt::WFlags flags )
12:     : QWidget( parent, flags )
13: {
14:     ui.setupUi( this );
15:
16:     ui.treeView->setModel( new AddressModel( this ) );
17:     ui.treeView->header()->setStretchLastSection( true );
18:
19:     connect( ui.treeView, SIGNAL(clicked(QModelIndex)), this, SLOT(showItem(QModelIndex)) );
20:     ui.map->show();
21: }
QTreeViewにAddressModelを設定して住所の一覧を表示させ、
28: void MainWindow::showItem( const QModelIndex& idx )
29: {
30:     ui.map->clearCoordinates();
31:     ui.map->geoCode( idx.data( Qt::UserRole).toString() );
32:     ui.nameLabel->setText( idx.data( Qt::DisplayRole ).toString() );
33:     ui.addressLabel->setText( idx.data( Qt::UserRole ).toString() );
34: }
先に説明したのと同様に、
51: void Map::loadCoordinates()
52: {
53:     QStringList scriptStr;
54:     scriptStr
55:             << "var map = new GMap2(document.getElementById(\"map\"));"
56:             << "var bounds = new GLatLngBounds;"
57:             << "var markers = [];"
58:             << "map.setCenter( new GLatLng(0,0),1 );";
59:
60:     int num=-1;
61:     foreach( QPointF point, coordinates ) {
62:         scriptStr << QString("markers[%1] = new GMarker(new GLatLng(%2, %3));")
63:                              .arg(++num)
64:                              .arg(point.x())
65:                              .arg(point.y());
66:     }
67:
68:     scriptStr
69:             << "for( var i=0; i<markers.length; ++i ) {"
70:             << "   bounds.extend(markers[i].getPoint());"
71:             << "   map.addOverlay(markers[i]);"
72:             << "}"
73:             << "map.setCenter(bounds.getCenter());";
74:
75:
76:     this->page()->mainFrame()->evaluateJavaScript( scriptStr.join("\n") );
77: }
得られた地理座標から地図上にマーカを表示し、
Webコンテンツ内でのQtのウィジェットの利用
ここまでの説明で、
図6は、
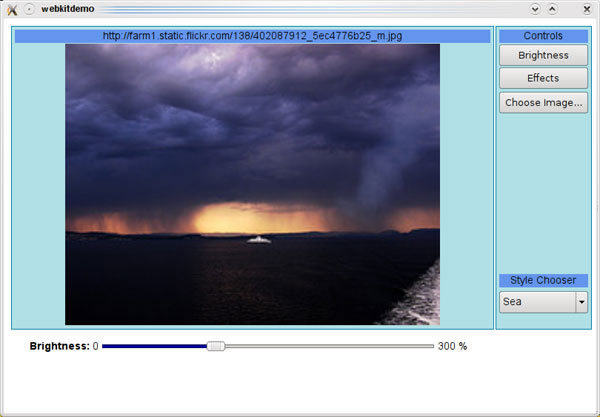
Qtウィジェットの利用方法
Qt Labsのサンプルでは、
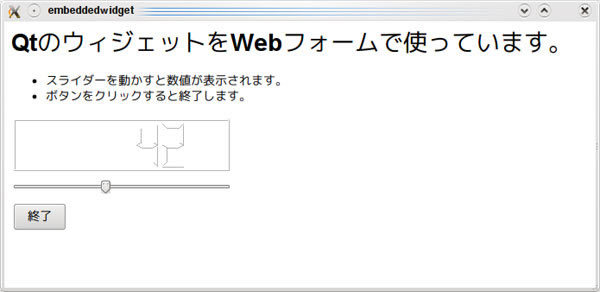
01: <html xmlns="http://www.w3.org/1999/xhtml" xml:lang="ja" lang="ja">
02: <head>
03:   <meta http-equiv="Content-Type" content="text/html; charset=UTF-8" />
04: </head>
05:
06: <body>
07:         <h1>
08:             QtのウィジェットをWebフォームで使っています。
09:         </h1>
10:
11:         <ul>
12:             <li>スライダーを動かすと数値が表示されます。</li>
13:             <li>ボタンをクリックすると終了します。</li>
14:         </ul>
15:
16:         <table>
17:         <tr>
18:         <td>
19:              <object classid="LCDNumber" type="application/x-qt-styled-widget" width=250 height=60>
20:              </object>
QtのウィジェットをHTML中で使うには、
type属性には、
widthやheightなどの属性は、
21:         </td>
22:         </tr>
23:         <tr>
24:         <td>
25:              <object classid="Slider" type="application/x-qt-styled-widget" width=250 height=30>
26:                  <param name="orientation" value="Horizontal">
27:              </object>
28:         </td>
29:         </tr>
30:         <tr>
31:         <td>
32:              <object classid="Button" type="application/x-qt-styled-widget" width=60 height=30>
33:                  <param name="text" value="終了">
34:              </object>
35:         </td>
36:         <td>
37:         </td>
38:         </tr>
39:         </table>
40: </body>
41:
42: </html>01: #include <QApplication>
02: #include <QWebView>
03: #include <QWebPage>
04: #include <QUrl>
05: #include <QPushButton>
06: #include <QSlider>
07: #include <QLCDNumber>
08: #include <QVariant>
09: #include <QDebug>
10:
11: class WebPage : public QWebPage
12: {
13: Q_OBJECT
14:
15: public:
16: WebPage( QWebView* parent = 0 );
17:
18: QObject* createPlugin( const QString& classid, const QUrl& url, const QStringList& paramNames, const QStringList& paramValues );
19:
20: private:
21: QLCDNumber* lcdNumber;
22: QSlider* slider;
23: QPushButton* pushButton;
24: };
25:
26: WebPage::WebPage( QWebView* parent )
27: : QWebPage( parent )
28: {
29: parent->setPage( this );
30:
31: slider = new QSlider;
32: lcdNumber = new QLCDNumber;
33: pushButton = new QPushButton;
34: Webフォームで使う3つのウィジェットを用意しています。
35:     connect( slider, SIGNAL(valueChanged(int)), lcdNumber, SLOT(display(int)) );
36:     connect( pushButton, SIGNAL(clicked()), qApp, SLOT(quit()) );
37: }
38:
39: QObject* WebPage::createPlugin( const QString& classid, const QUrl& url, const QStringList& paramNames, const QStringList& paramValues ){
40:     QWidget* widget = 0;
41:
42:     if ( classid == QString( "Slider" ) )
43:         widget = slider;
44:     else if ( classid == QString( "LCDNumber" ) )
45:         widget = lcdNumber;
46:     else if ( classid == QString( "Button" ) )
47:         widget = pushButton;
48:     else
49:         return 0;
50:
51:     for ( int i = 0; i < paramNames.size(); ++i )
52:         widget->setProperty( paramNames.at( i ).toLatin1().constData(), paramValues.at( i ) );
53:     return widget;
54: }
55:
HTML中の<OBJECT>タグのtype属性がapplication/
コンストラクタで生成したものもcreatePlugin()で生成したもののどちらについても、
56: int main( int argc, char** argv )
57: {
58:     QApplication app( argc, argv );
59:
60:     QWebSettings::globalSettings()->setAttribute( QWebSettings::PluginsEnabled, true );
61:
62:     QWebView webView;
63:     WebPage* webPage = new WebPage( &webView );
64:     webView.load( QUrl( "qrc:html/embeddedwidget.html" ) );
65:     webView.show();
66:
67:     return app.exec();
68: }
69:
70: #include "embeddedwidget.moc"QWidget *w = 0;
if (classid == QLatin1String("QLineEdit"))
w = new QLineEdit;
else if (classid == QLatin1String("QPushButton"))
w = new QPushButton;
else if (classid == QLatin1String("ImageView"))
w = m_imageView;
else if (classid == QLatin1String("Slider"))
w = m_slider;
else if (classid == QLatin1String("EffectCombo"))
w = m_effectsCombo;
else if (classid == QLatin1String("StyleCombo"))
w = m_styleCombo;
else
return 0;まとめ
この特集では、


