


今回は選択不能とチェックボックスなどをデザイン
前回は疑似セレクトボックスの利用によって、
それと今回はその前に、
まずは完成サンプルをみてください。
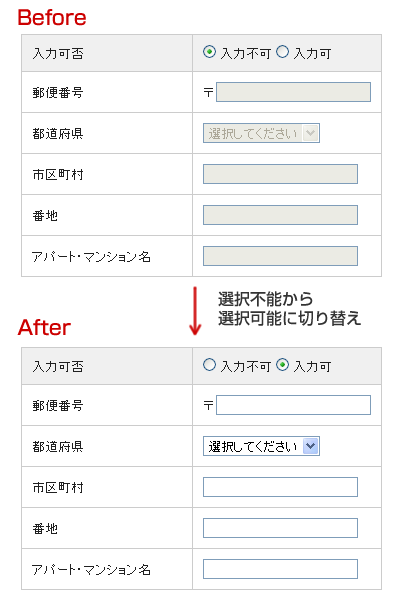
選択不能状態にしておくには、
完成サンプルにいたるまで、
disabled状態のフォーム
まずは実際にdisabled状態で、

HTMLに直接disabled="disabled"をいれてあります。HTMLに直に書いてしまうと、
ではまず、
disabledを解除するボタン
ボタンを押したら選択可能状態にする仕組みを入れてみます。
jQuery(function($){
    $('button').click(function(){
        $(':disabled','#formDemo').removeAttr('disabled');
        return false;
    });
});
「<button>」
disabled状態になっている要素を取り扱う場合は、
.attr()でdisabledを削除例
removeAttrにてdisabledを削除するほうが確実ですが、
しかし、
ラジオボタンで切り替え
ここまで、
先ほどまでにサンプルに、
<tr>
    <th class="check">入力可否</th>
    <td class="check">
        <input name="disabledRadio" type="radio" id="disabledRadio" checked="checked" />
        <label for="disabledRadio">入力不可</label>
        <input type="radio" name="disabledRadio" id="enabledRadio" value="" />
        <label for="enabledRadio">入力可</label>
    </td>
</tr>
そして切り替えをするScriptです。
jQuery(function($){
    $('#disabledRadio').attr('checked','checked');
    $('input,select','#formDemo').not('[name=disabledRadio]').attr('disabled','disabled').val('');
    $('input[name="disabledRadio"]:last').click(function(){
        $(':disabled','#formDemo').removeAttr('disabled');
    });
    $('input[name="disabledRadio"]:first').click(function(){
        $('input,select','#formDemo').not('[name=disabledRadio]')
            .attr('disabled','disabled').val('');
    });
});
最初の部分は初期状態にするリセットのようなもので、
あとは、
入力可をチェックした際は、
今回はラジオボタンでの切り替えにしたため、
シンプルな機能であれば、
入力内容の一時保存
入力内容を一時保存しておく方法はcookieを使うなどの方法も考えられますが、
dataメソッドは、
jQuery(function($){
    $('#disabledRadio').attr('checked','checked');
    $('input,select','#formDemo').not('[name=disabledRadio]').attr('disabled','disabled').val('');
    $('input[name="disabledRadio"]:last').click(function(){
        $(':disabled','#formDemo').each(function(){
            $(this).removeAttr('disabled');
            if($(this).data('valueLog')){
                $(this).val($(this).data('valueLog'));
            };
        });
    });
    $('input[name="disabledRadio"]:first').click(function(){
        $('input,select','#formDemo').not('[name=disabledRadio]').each(function(){
            $(this).data('valueLog',$(this).val())
                .attr('disabled','disabled').val('');
        });
    });
});
各セレクタに、
今回の例で言うと、

一度入力して、
dataを使うことで、
さて、
ラジオボタンのデザイン変更
ラジオボタンやチェックボックスもJavaScriptを使うことで、
擬似的というのは、
使用した画像


jQuery(function($){
    var img = 'images/radio.gif',
         img_on = 'images/radio_on.gif';
    $(':checked').removeAttr('checked');
    $('.radioImg input:radio').hide().after('<img src="' + img + '" />');
    $('.radioImg input:radio:hidden').next().click(function(){
        $('.radioImg :checked').removeAttr('checked');
        $(this).attr('src',img_on)
                .siblings().attr('src',img);
        $(this).prev().attr('checked','checked');
    });
    $('label').click(function(){
        $(this).prev().trigger('click');
    });
    /*以下おまけ*/
    $('button').click(function(){
        if($('[name="gender"]:checked').length > 0 && $('[name="gender2"]:checked').length > 0){
            alert('チェックされた値は「' + $('[name="gender"]:checked').val() + '」と「' + $('[name="gender2"]:checked').val() + '」');
        }else {
            alert('チェックされていない項目があります');
        }
    });
});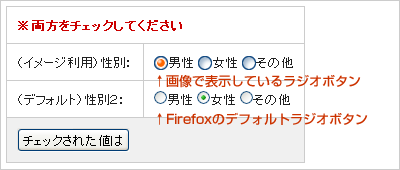

今回はimg要素の追加もJavaScript側で設定してあり、
Scriptの最初の部分(5行目)でデフォルトのラジオボタンを.hide()で非表示にし、
label部分をクリックした際は、
今回画像の切り替えのURLはスクリプト内で変数に入れて実行してありますが、
チェックボックスのデザイン変更
ラジオボタン同様に、
使用した画像


jQuery(function($){
    var img = 'images/check.gif',
         img_on = 'images/check_on.gif';
    $(':checked').removeAttr('checked');
    $('.checkImg input:checkbox').hide().after('<img src="' + img + '" />');
    $('.checkImg input:checkbox:hidden').next().toggle(function(){
        $(this).attr('src',img_on);
        $(this).prev().attr('checked','checked');
    },function(){
        $(this).attr('src',img);
        $(this).prev().removeAttr('checked');
    });
    $('label').click(function(){
        $(this).prev().trigger('click');
    });
    /*以下おまけ*/
    $('button').click(function(){
        var colorElm ='',
        colorElm2 = '';
        $('[name="color"]:checked').each(function(){
            colorElm += $(this).val();
        });
        $('[name="color2"]:checked').each(function(){
            colorElm2 += $(this).val();
        });
        alert('チェックされた値は「' + colorElm + '」と「' + colorElm2 + '」');
    });
});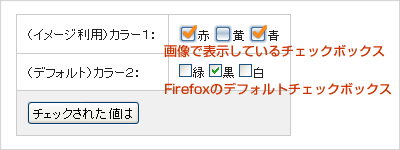

基本は先ほどの疑似ラジオボタンと同じですが、
前回のセレクトボックスでもそうですが、